Toggle navigation
gienginali
:::
主選單
資訊安全
網路測速
線上書籍
登入
登入
帳號
密碼
登入
:::
新聞載入中,請稍後...
所有書籍
「Proxmox VE 4.x 中文初階學習手冊」目錄
MarkDown
2-3-6 4.2版後不使用 lvm 恢復為 ext4 的方式(官網)
1. 導讀 Proxmox VE
1-1 前言 --- 企業級產品 買不起 還好有社群資源 支援 企業級的技術
1-2 建議閱讀參考資料
1-3 各家虛擬軟體比較
1-3-1 Proxmox VE 和 VMWare 比較
1-3-2 圖表
1-4 新版
1-4-1 4.2 版新增功能
1-5 攜碼跳槽前的準備(從 VirtualBox,VMWare,ESXi 轉換前的準備)
2. 安裝 Proxmox VE
2-1 開始安裝 Proxmox VE
2-1-1 proxmox 實體機的建議
2-2 開始在 實體機上 安裝 Proxmox VE
2-2-1 下載 proxmox 5.0 版的 .iso 檔
2-2-2 開始安裝 Proxmox VE
2-2-2-1 BIOS 設定
2-2-2-2 安裝方式1:以光碟開機安裝
2-2-2-3 安裝方式2:以隨身碟方式安裝
2-2-2-4 安裝方式3:直接將系統安裝在 USB 隨身碟上以隨身碟當開機碟
2-2-2-5 版權宣告
2-2-2-6 安裝提示訊息-硬碟格式化
2-2-2-7 時區與鍵盤設定
2-2-2-8 管理員密碼與 Email 設定
2-2-2-9 網路設定
2-2-2-10 複製系統與程式檔案
2-2-2-11 安裝完成第1次開機
2-2-3 管理
2-2-3-1 文字介面的管理-1.本機登入
2-2-3-2 文字介面的管理-2.遠端登入
2-2-3-3 Web 主控台方式登入-Firefox
2-2-3-4 Web 主控台方式登入-Chrome
2-2-4 第1次更新套件(debian update)
2-2-4-1 無購買企業支援授權
2-2-4-2 Proxmox 的 enterprise support
2-2-4-3 套件功能的更新(Proxmox update)
2-2-4-4 安裝其它套件
2-2-4-5 4.x ---> 5.x 升級版本
2-2-4-6 5.x ---> 6.x 升級版本
2-2-5 Proxmox VE 的安全性
2-2-5-1 proxmox ve 使用者權限管理功能
2-2-5-2
2-2-5-3 Root 的密碼 安全性
2-2-5-4 建立單一帳號管理單一虛擬機(for webgui)
2-2-5-5 建立一個具全部管理權限的使用者與群組
2-3 參考:安裝硬碟規劃
2-3-1 安裝時選擇 ZFS 格式
2-3-2 硬碟空間分割設定的規劃(系統預設自動分配)-以虛擬機安裝示範
2-3-3 硬碟空間分割設定的規劃(系統預設自動分配)-以實體機安裝示範
2-3-4 安裝Proxmox前安裝硬碟空間分割設定的規劃(手動分配)
2-3-5 刪除內建的LVM thin
2-3-6 4.2版後不使用 lvm 恢復為 ext4 的方式(官網)
2-4 將 Proxmox VE 安裝在 Debian 8
2-4-1 英文
2-4-2 中文(google 翻譯)
3. 開始建立虛擬機
3-0-0-1 建立虛擬機 的認識
3-0-1 LXC(Container)記憶體的使用
3-0-1 KVM - 文字模式 記憶體的使用
3-0-1 LXC(Container)和KVM 記憶體使用的差異
3-0-1 KVM - 圖形介面 記憶體的使用
3-0-1 虛擬硬碟的介面 (使用 .vmdk 映像檔快取定)
3-1 虛擬機開機
3-1 虛擬機遠端桌面
3-1 建立虛擬機
3-1 安裝虛擬機上的作業系統
3-1 KVM 虛擬機的安裝
3-2 LXC Container 虛擬機的安裝
3-2-1 前言暨建立LXC虛擬機
3-2-1-1 下載 樣版系統
3-2-1-2 開始建立 LXC 虛擬機(Linux Container)
3-2-1-3 LXC虛擬機的更新
3-2-1-4 LXC 虛擬機 OS 的實際大小
3-2-1-5 LXC 虛擬機中 ssh 中文輸入顯示功能/指令補完功能
3-2-2 安裝 SFS3
3-2-2-1 ssh 設定連線範圍
3-2-2-2 /bin/firewall 防火牆程式
3-2-2-3 LAMP的安裝
3-2-2-4 apache2 的設定
3-2-2-5 SFS3網頁連線範圍設定
3-2-2-6 sfs3程式的移轉
3-2-2-7 mysql 資料庫的移轉
3-2-2-8 配合縣網openid的設定
3-2-2-9 IP的設定變更/LXC虛擬機
3-2-2-10 IP的設定變更/kvm虛擬機
3-2-2-11 DNS 主機上的設定
3-2-2-12 cron 等排程備份程式
3-2-2-13 時區調整
3-2-3 LXC 容器 LXC Mounts 的方法
3-2-3-1 LXC 容器 LXC Bind Mounts
3-2-3-2 4.2版 Mount Point GUI 介面
3-2-3-3 4.4版 Mount Point GUI 介面
3-2-3-4 autofs 掛載 cifs (samba) / 實體機上掛載
3-2-3-5 NFS & Automount
3-2-3-6 MountPoint 遷移 解決方法
3-2-4 虛擬機調校
3-2-4-1 虛擬機瘦身
3-3 從實體機移轉為虛擬機 實作(非整機轉換)
3-3-1 sfs3 學籍系統
3-3-1-1 備份主機硬體設定
3-3-1-2 備份原始主機資料
3-3-1-3 備份 sfs3 實體主機設定檔、網頁、資料庫 script
3-3-1-4 準備 樣版 LXC
3-3-1-5 sfs3 實體主機設定檔、網頁、資料庫 ---> Proxmox VE
3-3-1-6 在虛擬機 LXC 212 中解壓縮檔案
3-3-1-7 還原 sfs3 網頁
3-3-1-8 還原 apache2 虛擬網站設定
3-3-1-9 修改 sfs3 設定檔
3-3-1-10 還原 mysql 資料庫
3-3-1-11 變更 mysql root 密碼
3-3-1-12 還原 hosts.allow hosts.deny crontab ACFSsfsBK.txt
3-3-1-13 變更 hostname 和 hosts
3-4 刪除虛擬機
3-4-1 存放位置:local
3-4-2 存放位置:local-lvm
3-4-3 ZFS pool
4. VirtualBox、VMWare 移轉至 proxmox
4-0-1 樣版虛擬機製作
4-1 vdi 硬碟映像檔 轉換 至 proxmox 的 qcow2 格式
4-1 虛擬硬碟-格式轉換
4-1 How to convert VirtualBox vdi to KVM qcow2
4-1 Proxmox VE無法開啟vmdk格式虛擬機器的問題
4-2 使用 VirtualBox 的虛擬硬碟轉換後的檔案的移機
4-2-1 Proxmox VE 的設定檔與虛擬機儲存位置
4-2-1-1 proxmox VE 設定檔放置位置
4-2-1-2 Proxmox VE 虛擬機儲存位置
4-2-2 建立 VM 樣版
4-2-2-1 開始建立 VM 樣版
4-2-2-2 新建立的樣版 VM
4-2-2-3 新增加一顆 SATA 介面的虛擬硬碟
4-2-2-4 變更 虛擬硬碟檔案的檔名
4-2-2-5 啟動虛擬機
4-2-2-6 關閉虛擬機
4-2-2-7 esxi 虛擬機轉到ProxmoxVE
4-3 VMWare 轉換 為 Proxmox VE
4-3-1 Proxmox 筆記 vsphere 轉移篇
4-3-2 文章:Esxi移機到Proxmox-檔案格式轉檔、iscsi、nfs串連教學、虛擬機新增及相關備忘事項
4-3-3 KVM 的 vmdk to qcow2 方式
4-3-4 OVA 檔案轉換成 qcow2
4-4 實體機轉換為虛擬機
4-4-1 參考資料
4-4-1-1 ==實體機轉換成虛擬機
4-4-1-2 virt-p2v
4-4-1-3 KVM 的 P2V k 可以根據 redhat 的模式, 也可以做到
5. Storage 儲存容器
5-1 Directory - proxmox實體機安裝第二顆硬碟 掛載為Directory
5-2 Directory
5-3 NFS
5-4 ZFS
6. Live Migration
6-1 備份與移機原文位址: http://viewcamerafan.blogspot.tw/2011/11/proxmox-ve.html
7. 虛擬機的移機 備援 備份 重建 還原
7-1 KVM (qemu)的複製(手工)
7-1-1 3.2 版的操作
7-1-1-1 虛擬機的備份或移機-手動方式
7-1-1-2 設定檔修改與檔名變更
7-1-1-3 兩台 proxmox 主機間的直接手動設定複製
7-1-1-4 利用 scp 指令把虛擬機直接 從另一台 proxmox 主機 copy 回來
7-1-1-5 以 script.sh 手動方式備份 VM 至另一台主機
7-1-1-6 以 script.sh 結合管理遠端主機VM的啟動/關閉
7-1-1-7 以變數代入 script
7-1-2 Proxmox VE 3.3 版的操作
7-1-2-1 虛擬機整機複製
7-1-2-2 手動複製 VM
7-1-3 Proxmox VE 4.0 b1 版的操作
7-2 LXC(Container) 的複製(手工)
7-2-1 LXC(Container) 的複製 實作-複製映像檔
7-2-2 LXC(Container) 的複製 實作-複製並修改設定檔
7-3 Proxmox VE 正規 備份/還原
7-3-1 Backup 備份 虛擬機
7-3-1-1 Backup 1. LXC
7-3-1-2 Backup 2. KVM
7-3-1-3 vzdump 備份時 io 權限調整
7-3-1-4 vzdump 虛擬機備份打包指令
7-3-2 虛擬機差異性備份(不建議使用,請改用zfs差異性備份)
7-3-2-1 Proxmox 上的每日差異備份
7-3-2-2 差異性備份-非官方-不建議使用
7-3-2-3 差異性備份(實作)---非官方-不建議使用
7-3-3 Restore 還原虛擬機 (從備份檔還原) LXC、KVM
7-4 利用 Backup 來複製 虛擬機
7-4-1 複製 LXC 虛擬機
7-4-2 複製 KVM 虛擬機
7-5 利用 ZFS send / receive 來直接跨主機間備份/複製虛擬機
7-5-1 ZFS send / receive 將 zfs 分割區 直接複製
7-5-2 ZFS send / receive 將 zfs 分割區 增量複製
7-5-2-1 實作
7-5-2-2 實作2
7-5-2-3 1 對 N 快照差異性傳送模式
7-5-3-4 實作2-script 配合 crondtab 自動同步
8. DATACenter -叢集管理功能-管理全部主機
8-1-1 將其餘的主機加入集叢( Cluster )
8-1-2 集叢 與 LXC 虛擬機 的相關問題
8-1-3 脫離 Cluster(刪除其中一個 node)
8-1-4 從集叢中刪除其中一台主機(Remove a cluster node)
8-1-5 把原來刪除的 node 再重新加回來
8-1-6 del node
8-1-7 cluster 從三個 node 變成只有兩個 node
8-2 遷移虛擬機器
8-3 遷移虛擬機器與注意事項
8-4 PVE 4.2 Cluster 修改方式
9. ZFS
9-0-1 ZFS 檔案系統基本概念
9-0-2 安裝 ZFS 功能
9-0-3 記憶體參數設定 zfs arc
9-0-4 在巢狀虛擬系統下使用 zfs 時虛擬機裡虛擬硬碟的類型
9-0-5 指定 ZFS 掛載目錄
9-0-6 zfs 維護指令
9-1 PVE 4.4 安裝 OpenAttic 套件/簡單管理 ZFS
9-1-1 Openattic 現在 3.0 版本出來了, 它能管理的檔案儲存系統跟格式更多, 同時界面更加完善簡潔
9-2 將硬碟格式化為 ZFS 格式及ZFS分割區
9-2-1 選擇單顆硬碟或製作磁碟陣列
9-2-1-1 ZFS 建立基本指令
9-2-1-2 單一顆硬碟 ---> ZFS 格式
9-2-1-3 二顆硬碟 ---> ZFS 格式 Raid0
9-2-1-4 二或四顆硬碟 ---> ZFS 格式 Raid1 (Mirror) Raid10 (Mirror Mirror)
9-2-1-5 二顆硬碟 ---> ZFS 格式 RAID Z-1
9-2-2 附註:zfs 陣列變換 一顆硬碟在安裝完 zfs raid 0 後想再增加一顆硬碟做成 zfs mirror (raid 1)
9-2-3 建立 ZFS 的分割區
9-2-3-1 ZFS 的分割區 的建立 與 刪除
9-2-3-2 ZFS 的分割區 的 搬移、更名、刪除
9-2-3-3 建立與摧毀磁碟區-建立具快照的 fat 檔案系統
9-2-3-4 比對快照
9-2-3-5 加入與移除裝置
9-2-3-6 更換運作中的裝置
9-2-3-7 更換運作中的裝置
9-2-3-8 清潔儲存池
9-3 Snapshot 快照功能 (檔案時光機)
9-3-1 Snapshot 快照的建立
9-3-2 Snapshot 刪除快照
9-3-3 Snapshot 回復到過去任意的還原點
9-3-4 Snaoshot cron 定時快照 script
9-3-4-1 配合 crontab 定時將虛擬機製作快照
9-3-4-2 script snapshot 不同期間快照保存份數主程式
9-3-4-3 script 快照刪除程式
9-3-5 Snapshot 備份/使用 replication
9-3-5-1
9-3-6 zfs send recive 的應用實作
9-4 製作以 USB 隨身碟開機的步驟
9-4-1 變更USB隨身碟的讀寫區到硬碟
9-5 硬碟更換
9-5-1 實作1 zfs Raid1 陣列替換固障硬碟
9-6 man zfs
9-6-1 man zfs ( Proxmox VE )
9-6-2 man zfs ( ubuntu 1404 )
9-7 測試報告
9-7-1 ZFS Raidz Performance, Capacity and Integrity
9-7-2 swap on zfs
9-7-3 zfs 測試工具
9-7-4 zfs 2018 新功能
9-8 其它秘技
9-8-1 qcow2或vmdk是以檔案的方式放在ZFS上,disk的cache設定記得要使用write back
10. 10
10-1 routeros 24hr版 抓不到硬碟無法安裝
10-2 虛擬硬碟容量擴充
11. 手動升級
11-1 下載新版的iso檔
11-2 安裝新版的硬碟
11-3 備份原始開機硬碟的設定
11-4 接上新硬碟
11-5 將設定檔寫至新硬碟
12. Proxmox VE 的應用
12-1 KVM 虛擬機 將備份上傳至 google drive 雲端硬碟
12-1-1 安裝套件
12-1-1-1 KVM 虛擬機 安裝套件
12-1-1-2 實體機 安裝套件
12-1-2 實作
12-1-2-1 實體主機上的 NFS 分享
12-1-2-2 虛擬機上的設定
12-1-2-3 實際上機操作上傳
12-1-3 應用
12-2 在 LXC 安裝OpenMediaVault 並附加 HW block device
12-2-1 在 LXC 安裝OpenMediaVault 並附加 HW block device
12-2-2 將 OMV3 安裝在 LXC 裡
12-2-3 在 Proxmox VE 5.1 LXC 中安裝 OpenMediaVault 4
12-2-4 利用 ZFS 和 Proxmox VE 自建 NAS
13. 問題排除
13-1 Proxmox 3.1 客端關機或是重新開機都會lock住
13-2 Error closing file /var/tmp/pve-reserved-ports.tmp.43281 failed - No space left on device (500)
13-3 某一本右側書籍目錄無法顯示
13-4 LXC 無法啟動 ( Cluster 相關 )
13-4-1 重開機後 LXC 無法啟動
13-5 PVE 4.2 嚴重 BUG
13-6 pve4.4 zfs on root 不支援 UEFI 開機模式
13-7 安裝 Qemu Agent - 節省 KVM 使用的記憶體使用量(windows)
13-8 主機重新安裝後 虛擬機存放在 zfs dataset 裡的東西都不見了
14. 概念
14-1 VM 的安全性
15. 其他技術
15-1 主機硬體支援虛擬化
15-1-1 Proxmox VE 中 安裝 Proxmox VE(Proxmox VE Nested Virtualization)
15-2 改機
15-2-1 NAS 改 Proxmox VE 4.1 教學
15-3 PVE GPU passthrough
15-4 掛載硬體
15-4-1 Proxmox Physical disk to kvm (KVM 虛擬機直接使用實體硬碟)
15-5 How To Create A NAS Using ZFS and Proxmox (with pictures)
15-6 網路速率
15-6-1 Linux開啓BBR擁塞控制算法
15-7 樣版
15-7-1 PVE 自訂 LXC 樣版來產生 CT
15-8 pve 优化
16. 外文資料
16-1 FB proxmox
16-1-1 pve 4.4 ZFS
16-2 在 Debian 8 上安裝 Proxmox VE
17. 參考文章
17-1 手動安裝 java jdk
17-2 promox 指令
17-3 proxmox 常用指令
17-4 在Proxmox VE中加入NFS資料儲存伺服器
17-5 Proxmox - USB pass-through
17-6 遠端執行命令、多台機器管理(Push.sh)
17-7 不用密碼直接用 ssh 登入到遠端電腦
17-8 rsync 檔案備份
17-9 透過rsync備份
17-10 ssh 免密碼登入
17-11 ssh 免密碼登入 & 資料
17-12 proxmox 3.4 版無法安裝 nfs-kernel-server
17-13 手動方式升級
17-14 Ubuntu 12.04 LTS 及ubuntu14.10 -- NFS安裝
17-15 pve 在 i386 機器
17-16 Proxmox VE的不足
17-17 Proxmox Virtual Environment 筆記
17-18 KVM to LXC 與 LXC to KVM
17-19 Proxmox VE USB Physical Port Mapping
17-20 Proxmox VE Physical disk to kvm
17-21 ceph要七台主要的考量
17-22 zfs 入門與管理技術
17-23 RAID-1 陣列讀取資料方式
17-24 How to mount Glusterfs volumes inside LXC/LXD (Linux containers)
17-25 變更 Proxmox VE 主機名稱 hostname
17-26 PVE內建的防火牆
17-27 未整理的指令
17-46 Proxmox VE 可以結合 FreeNAS 使用 ZFS over iSCSI,做到兼具 Block Level 效能與 WebUI 管理
18. 新增/修改記錄
19. 友站連結
2-4-2 中文(google 翻譯)
Proxmox VE 4.x 中文初階學習手冊 ======================= <span style="font-size:20px;"><https://www.howtoforge.com/tutorial/how-to-install-proxmox-ve-4-on-debian-8-jessie/></span> How to Install Proxmox VE 4 on Debian 8 (Jessie) ================================================ [Secure and easy to use platform to manage your WordPress sites & ecommerce!](https://srv.buysellads.com/ads/click/x/GTND423NF6BD553EF6A4YKQWCYAIV5Q7CVYI5Z3JCESDL2QNC6YIE5QKC6BDK5QWCWBI6K3EHJNCLSIZ) ### On this page 1. [Prerequisites:](https://www.howtoforge.com/tutorial/how-to-install-proxmox-ve-4-on-debian-8-jessie/#prerequisites) 2. [Step 1 - Configure FQDN](https://www.howtoforge.com/tutorial/how-to-install-proxmox-ve-4-on-debian-8-jessie/#step-configure-fqdn) 3. [Step 2 - Add the Proxmox Repository](https://www.howtoforge.com/tutorial/how-to-install-proxmox-ve-4-on-debian-8-jessie/#step-add-the-proxmox-repository) 4. [Step 3 - Install Proxmox](https://www.howtoforge.com/tutorial/how-to-install-proxmox-ve-4-on-debian-8-jessie/#step-install-proxmox) 5. [Step 4 - Connect to the Proxmox web interface and configure the network](https://www.howtoforge.com/tutorial/how-to-install-proxmox-ve-4-on-debian-8-jessie/#step-connect-to-the-proxmox-web-interface-and-configure-the-network) 6. [Step 5 - Adding a new ISO or VM Template](https://www.howtoforge.com/tutorial/how-to-install-proxmox-ve-4-on-debian-8-jessie/#step-adding-a-new-iso-or-vm-template) 7. [Step 6 - Create the first Virtual Machine](https://www.howtoforge.com/tutorial/how-to-install-proxmox-ve-4-on-debian-8-jessie/#step-create-the-first-virtual-machine) 8. [Step 7 - Configure the network for the new Virtual Machine](https://www.howtoforge.com/tutorial/how-to-install-proxmox-ve-4-on-debian-8-jessie/#step-configure-the-network-for-the-new-virtual-machine) 9. [Conclusion](https://www.howtoforge.com/tutorial/how-to-install-proxmox-ve-4-on-debian-8-jessie/#conclusion) Proxmox Virtual Environment or short Proxmox VE is an Open Source server virtualization software based on Debian Linux with an RHEL kernel, modified to allow you to create and deploy new virtual machines for private servers and containers. Proxmox provides two types of virtualization: containers with LXC and full virtualization with KVM. Proxmox gives you an easy way to install and configure virtual machines from a web browser (Java plugin Iced tea required), it offers nice command line tools and a REST API for the third-party applications. If you want to install on a server that you have physical access to, then download the Proxmox iso from the official website. In this tutorial, I will show you the installation of Proxmox on a server that runs a minimal Debian 8 installation, e.g. in a datacenter. **Proxmox features:** - Support for local storage with LVM groups, directories, and ZFS. - Support for network storage with iSCSI, Fiber Channel, NFS, GlusterFS, CEPH, and DRBD. - Cluster support to build High Availability clusters. - Live migration, virtual machines can be moved from one host to another host without downtime. - Proxmox provides pre-packaged server software appliances which can be downloaded via the GUI. In this tutorial, I will guide you trough the Proxmox installation on Debian Jessie. Prerequisites: -------------- - Debian Jessie 64 bit. - Root privileges. Step 1 - Configure FQDN ----------------------- The first step that we will start with is to configure the server FQDN (Fully Qualified Domain Name). Check the server hostname with the command below: hostname Result: ``` aumu ``` So my server hostname is "aumu". Edit the "/etc/hosts" file with vim and add your server "IP + hostname.domain-name.com + hostname". vim /etc/hosts I'll add configuration for the host below: 192.168.1.111 aumu.myproxmox.co aumu Replace the hostname and FQDN with the one that you like to use for your server, then save the configuration and exit. Reboot the server and check the hostname and the FQDN: reboot Login again and check hostname and FQDN: hostname The result should be: ``` aumu ``` hostname -f The result should be: ``` aumu.myproxmox.co ``` [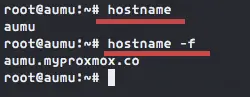](https://www.howtoforge.com/images/how-to-install-proxmox-ve-4-on-debian-8-jessie/big/Proxmox_hostnam_FQDN.png) Step 2 - Add the Proxmox Repository ----------------------------------- Now add the Proxmox repository to "sources.list.d" directory and add the Proxmox key to authenticate the packages: echo "deb http://download.proxmox.com/debian jessie pve-no-subscription" > /etc/apt/sources.list.d/pve-install-repo.list wget -O- "http://download.proxmox.com/debian/key.asc" | apt-key add - Now update the Debian repository and run a dis-upgrade on the system, then reboot the machine: apt-get update && apt-get dist-upgrade reboot Step 3 - Install Proxmox ------------------------ Install Proxmox VE and some other required packages with the apt command below: apt-get install proxmox-ve ntp ssh postfix ksm-control-daemon open-iscsi systemd-sysv Note: Postfix configuration during the installation: - Type of mail configuration: Internal Site. - System mail name: type the domain name. Reboot the server: reboot Step 4 - Connect to the Proxmox web interface and configure the network ----------------------------------------------------------------------- After the server has been restarted, we now can access the Debian Proxmox from a browser. Type in the server IP with https and port 8006 in the URL bar. In my case: <https://192.168.1.111:8006/> [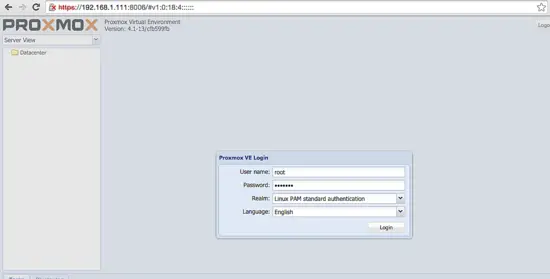](https://www.howtoforge.com/images/how-to-install-proxmox-ve-4-on-debian-8-jessie/big/Proxmox_Login.png) Login to the Proxmox admin with username root and your password. After gging into the web interface, we have to configure the networking for Proxmox. I've one network interface "eth0" for outgoing connections with the IP address '192.168.1.111' and my gateway is '192.168.1.254'. In this step, we want to create a new network interface (bridge) 'vmbr0', then we enable routing on this network interface and enable proxy arp on the outgoing interface 'eth0'. Vmbr0 is the interface for the VM's (Virtual Machines) in Proxmox. This is a good option if we only have one public IP and we want the to hide the VM's behind the host IP. Go to the '/etc/network' directory and edit interfaces file with vim. cd /etc/network/ vim interfaces Below my eth0 configuration with the option enable proxy arp. auto eth0 iface eth0 inet static address 192.168.1.111 netmask 255.255.255.0 gateway 192.168.1.254 post-up echo 1 > /proc/sys/net/ipv4/conf/eth0/proxy\_arp Next, configure a new bridge vmbr0 and enable routing on this interface by adding configuration below: auto vmbr0 iface vmbr0 inet static address 192.168.2.9 netmask 255.255.255.0 bridge\_ports none bridge\_stp off bridge\_fd 0 post-up echo 1 > /proc/sys/net/ipv4/ip\_forward post-up iptables -t nat -A POSTROUTING -s '192.168.2.0/24' -o eth0 -j MASQUERADE post-down iptables -t nat -D POSTROUTING -s '192.168.2/24' -o eth0 -j MASQUERADE **Note:** A virtual machine in Proxmox will use this interface and get an IP address '192.168.2.xxx'. The two lines at the bottom will enable the NAT function. Save the configuration and exit, then reboot the server: reboot Now check the server IP, we will have two network interfaces eth0 and vmbr0. **Note:** There are many options to configure the Network in Proxmox VE, you can find the full documentation about Proxmox network configuration options here [https://pve.proxmox.com/wiki/Network\_Model](https://www.howtoforge.com/admin/articles/add/There%20is%20many%20option%20to%20configure%20the%20Network%20on%20Proxmox%20VE,%20you%20see%20full%20documentation%20about%20Proxmox%20network%20configuration%20https:/pve.proxmox.com/wiki/Network_Model.). Step 5 - Adding a new ISO or VM Template ---------------------------------------- In this step, we will add a new ISO file for the VM installation. We can add an ISO file from within the web interface by uploading the file, or we can download the iso file directly to the server on the command line (this is my recommendation). Download iso file to directory "/var/lib/vz/template/iso" with wget or curl. Example to download a Ubuntu 15.04 image: cd /var/lib/vz/template/iso/ wget http://releases.ubuntu.com/15.04/ubuntu-15.04-server-amd64.iso ### Step 6 - Create the first Virtual Machine ----------------------------------------- Log into the Proxmox web interface, click on the right corner on the "Create VM" button. [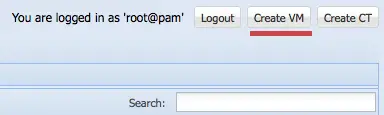](https://www.howtoforge.com/images/how-to-install-proxmox-ve-4-on-debian-8-jessie/big/1.png) Then you will get a new form, Name is the name of the new virtual machine here. Then clicks Next. [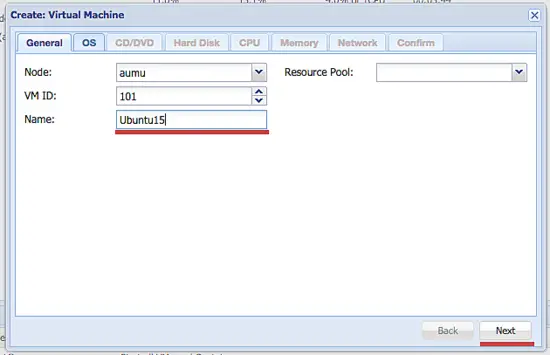](https://www.howtoforge.com/images/how-to-install-proxmox-ve-4-on-debian-8-jessie/big/2.png) Select your Operating System. Here I will use Ubuntu Linux with kernel version 4. and click Next. [](https://www.howtoforge.com/images/how-to-install-proxmox-ve-4-on-debian-8-jessie/big/3.png) <ins><ins><iframe frameborder="0" height="250" id="google_ads_iframe_howtoforge_com_article_rectangle_b_300x250" marginheight="0" marginwidth="0" name="google_ads_iframe_howtoforge_com_article_rectangle_b_300x250" scrolling="no" width="336"></iframe></ins></ins> Select the ISO file that we've downloaded on step 5, then click Next. [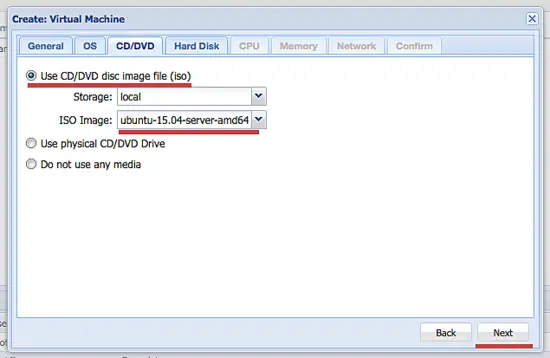](https://www.howtoforge.com/images/how-to-install-proxmox-ve-4-on-debian-8-jessie/big/4.png) Set the disk size for the virtual machine and click Next. [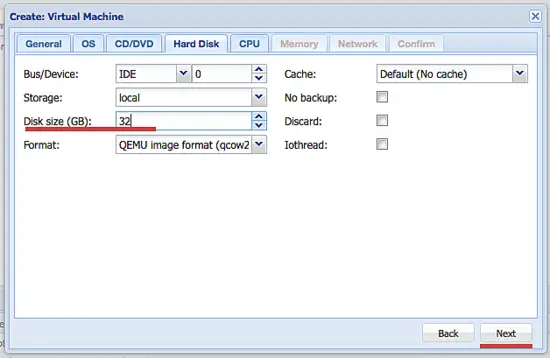](https://www.howtoforge.com/images/how-to-install-proxmox-ve-4-on-debian-8-jessie/big/5.png) CPU configuration - core, sockets, type of virtual machine (here we use kvm64) and click Next. [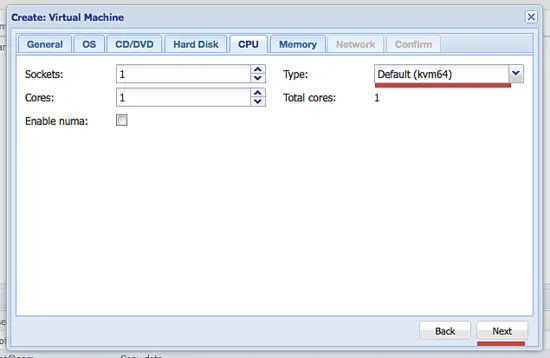](https://www.howtoforge.com/images/how-to-install-proxmox-ve-4-on-debian-8-jessie/big/6.png) Give memory/RAM size for the virtual machine and click next. [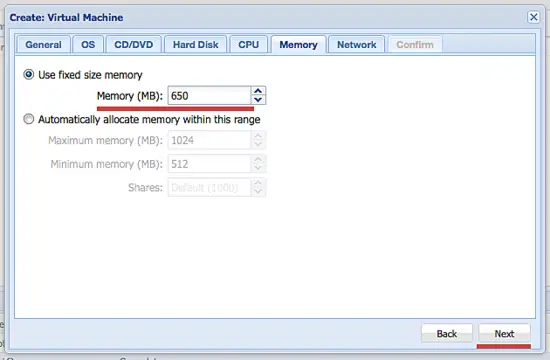](https://www.howtoforge.com/images/how-to-install-proxmox-ve-4-on-debian-8-jessie/big/7.png) On the network configuration, select bridge mode to vmbr0. And the Model I use Realtek RTL8139. Click next. [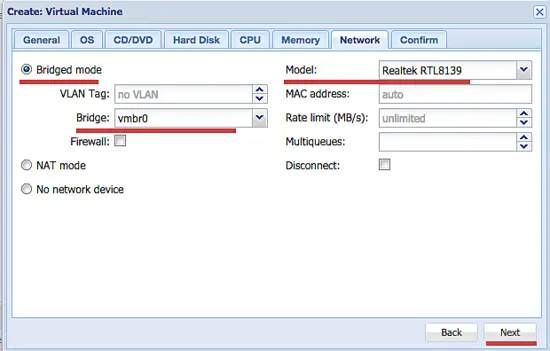](https://www.howtoforge.com/images/how-to-install-proxmox-ve-4-on-debian-8-jessie/big/8.png) And confirm the configuration by clicking on 'Finish'. [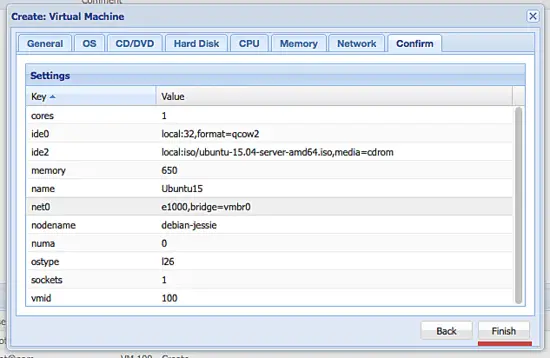](https://www.howtoforge.com/images/how-to-install-proxmox-ve-4-on-debian-8-jessie/big/9.png) Now we van start the VM installation by clicking on the 'start' button and accessing the VM by clicking on 'console'. [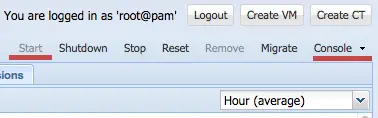](https://www.howtoforge.com/images/how-to-install-proxmox-ve-4-on-debian-8-jessie/big/10.png) Now you can install the Ubuntu OS in the VM in the way you like. Step 7 - Configure the network for the new Virtual Machine ---------------------------------------------------------- When the VM is installed, we will have to configure the network so that the VM can access the internet. Edit the interfaces file in the VM. cd /etc/network/ vim interfaces I will add a new interface 'eth0' in the VM by adding the configuration below: auto eth0 iface eth0 inet static address 192.168.2.10 netmask 255.255.255.0 gateway 192.168.2.9 Save the file and exit. **Note:** The gateway IP is vmbr0 IP address on the host machine. Now reboot the virtual machine and then try to access the internet by updating the repository or ping a server. The proxmox installation is finished. **Note:** If you want to access the VM from the outside of proxmox, then you have to add new port forwarding rule on the host. For example, to access the SSH service in the VM, add the IPTables rules below: iptables -t nat -A PREROUTING -i eth0 -p tcp -m tcp --dport 2222 -j DNAT --to-destination 192.168.2.10:22 iptables-save The iptables rule will route the eth0 interface port 2222 to the virtual machine on IP 192.168.2.10 port 22. So now we can access the SSH in the VM from outside: ssh -p 2222 vmusername@HOSTIP Conclusion ---------- Proxmox VE is an open source server virtualization based on Debian OS. Proxmox available as ISO file, so we can directly download and install it when we have physical access to the server, or we can install proxmox on our Debian server. Proxmox is powerful and easy to use, it provides a web-based administration interface so we can install and configure virtual machines with our Browser (Java and Icedtea should be installed). We can also configure Proxmox from the command line of the server, and Proxmox provides REST API for third-party applications. Proxmox has support for local and network storage systems, comes with high availability options builtin and provides functions for easy backup and restore of virtual servers. In my opinion, it is one of the best solutions for server virtualization.
:::
展開
|
闔起
文章類別
書籍目錄
展開
|
闔起
線上使用者
3
人線上 (
3
人在瀏覽
線上書籍
)
會員: 0
訪客: 3
更多…

